Image Blinking

Image Blinking is a great way to look for Supernova, Near Earth Objects and even to see the quality of the images you’ve taken. Its a simple process where you take your images and create a movie. You are typically looking for an object to be moving across your screen in a straight line or a star to appear in your image at a specific point. Another great way to use the blink tool is to use it on your comet images to see your comet move across space {Comet Blink Video}. Below are 2 videos showing you how to Blink your images in Pixinsight and Maxim.
Pixinsight: Pixinsight Blink.pdf (If you prefer a written version see the attached with non working GIF’s or below the video with working GIF’s)
PIXINSIGHT BLINKING (Written tutorial is below the video)
Files needed: FFMPEG Encoder/decoder
Blinking in Pixinsight is fairly easy with 2 simple processes. The first step will be to align your images using Star Alignment. You can blink without aligning your images however if you Dither when guiding then your images will be jumping around as you blink (See Gif)

To star align open up the process Star Alignment. Add your files to the target Images area and then select your reference image. If you have the images open in Pixinsight you can use the View option or use the File option and just select the file you want to use. Choose your output directory and globally apply (Circle Icon)

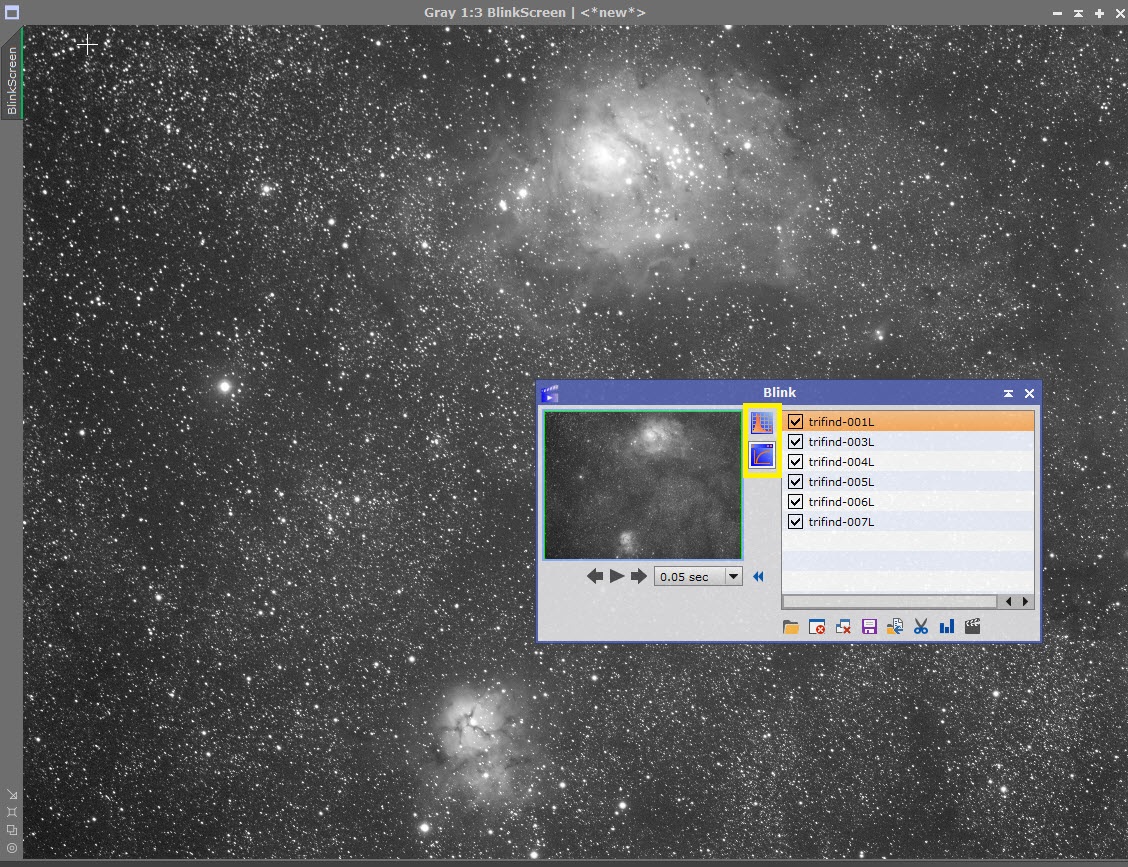
Once you align your images you want to open the Blink Process. When the Blink window opens click on the folder icon and select the images you want to blink.

When you add the images you will see the blink window loaded with the ones you selected and an image will be loaded as well which is the video. You have 2 choices of stretching your image (See yellow boxed options). The first one is to do an auto histogram stretch on your images. The second is to do an auto Screen Transfer Function. Pick the one that best stretched your image without blowing it out. The stretch will apply to all the images.
Once you have stretched the image you can click the play button to see how fast the images are cycled. You can adjust the speed through the scroll down bar to the right of the play button. (See Gif for stacked Animation)
You may see white pixels jumping around different areas of your image. This is typically seen when you dither. These pixels in a stacked image will be stacked out but when you blink you see them jumping around. These are not something you are looking for when looking for movement in your image. (See pixels in GIF Below)
If you are blinking to look for NEO’s or Supernova’s you don’t want to use images that have distortions, for instance cloud gradient or guiding issues. If you see images with a low quality you can click on them and select the close selected images icon .
If you see something in your image such as an NEO that moves thorough a specific area of your image you can crop that specific area. You will need to press Alt+N (as if you are doing a preview window) and then Click on an image name in your blink window and press Ctl+A to select all. Then press the scissor icon . A window will open for you to save the new cropped files in. Once you save the files click on the close all icon . Then click on the folder icon and open the newly saved cropped images (Such as the image above showing the moving pixels)
If you want to export as a video you will need to download the FFMPEG Encoder/decoder.
Then on the blink window click the Animation icon. In the animation window in the program area you want to put the directory location of the FFMPEG program. Then select your output directory. If you don’t click the delete .PNG video files then the individual .PNG files will be saved with the video file in the output folder.

You will now have a saved video file of your Pixinsight Blink Animation.
Maxim DL Tutorial
Maxin DL Animate Process : Maxim DL.pdf (If you prefer a written version see the attached with non working GIF’s or below with working GIF’s)
Animating your images in Maxim DL is very easy. You first want to start by opening all the images you want to animate in Maxim. Unlike Pixinsight you cant select animate in the Maxim menu bar with no images opened in the program.

After you click animate in the drop down menu a window will open with all the images you have open in Maxim listed. You have several options here. You can click the Add All button to add all your images or you can click on each image you want to add and push the >> button. If you have images you don’t want in the animated video that you accidentally added then select that image and click the << button to remove them.
The other options are to Sort the list, which will order the files numerically. You also have move up and move down to adjust the order of the images.

Once you have the imaged added click the Align button. If you pre-aligned your image you can select none for the alignment. If you didn’t align this has a nice feature Pixinsight doesnt have and you can align prior to the video being created. You can align anyway you want but the easiest would probably be one star Auto Alignment.

When you finish the alignment the screen will go back to the Animate window and click OK. A new image window will open labeled Animate as well as a video control window. The image will be at 100% view so you may want to reduce the percentage to 50% or less to see the entire image.
The control box lets you scroll individually using the arrow buttons. The stop button will stop the video. The play button will let you play the animation. The arrow circle button when pushed allows for a continuous infinite loop of the animation. Lastly the movie projector lets you export the animated movie.

Here is the Maxim Animation. You can see in the Animate-(Image name) tab as the blinking moves through each image.

If you want to save your animated images as a video you can click on the movie projector button and select the options you want such as frame rate and click ok. A window will open up to save the AVI to a specified location and your done.

That is the Blink/Animate Process for Pixinsight and Maxim DL. Pixinsight has more options to process a blink animation however both are easy to setup and use to create Astro videos. Try blinking all your imaging data. You never know when you might discover something as an Amateur or Professional Astronomer.
Check out our other tutorials.