Maxim DL Tutorial

Maxim DL is a staple among astrophotographers. Its practically an all in one program that provides Integration, Guiding, Go to Star map, Plate solving, Focus routines and post processing. This extensive tutorial will focus on the setup of Maxim through Integration. We will have a part 2 on Post Processing. We will focus on integration with a mono camera however we will touch upon the important factors for a one shot color (OSC). I will specify what steps to skip if using a OSC.
The first things you need to get going is the demo version of Maxim: Maxim DL. The cost of Maxim varies from $199.00 to $599.00 depending on the version you want and the options you prefer. The license is good for a year of updates. After a year you can upgrade your software or license at a discounted price, However the cost savings is not that much from full price. You can see the difference between the levels at the bottom of this tutorial.
You will also need the Plate solve files GSC11. This will get installed in your C:\. You can use other catalogs but this is the most popular. If you want to use a different plate solve catalog you can find them here for download: Plate solve catalogs
Lastly if you have an FLI Camera you will need a special DLL to add to the Diffraction Limited Program Directory. FLI DLL
Once you install Maxim and open the program you will see many icons under the main menu. Most of these you will not need right away and can seem intimidating. There are 5 main ones you will need highlighted in yellow.
The first one is your stretch window. You will use this to increase the detail of your image during integration and post process. The second is the information window. You can use this to check your focus, background and other aspects of your image. The third is your camera setup. This one you setup your main camera, guider camera and filter wheel. The fourth is the observatory window. Here you connect all your other equipment as well as your site and optics, focus, star catalog and more. Lastly is the night vision. This will make your screen red to protect your night vision and eliminate white light that could compromise your image.


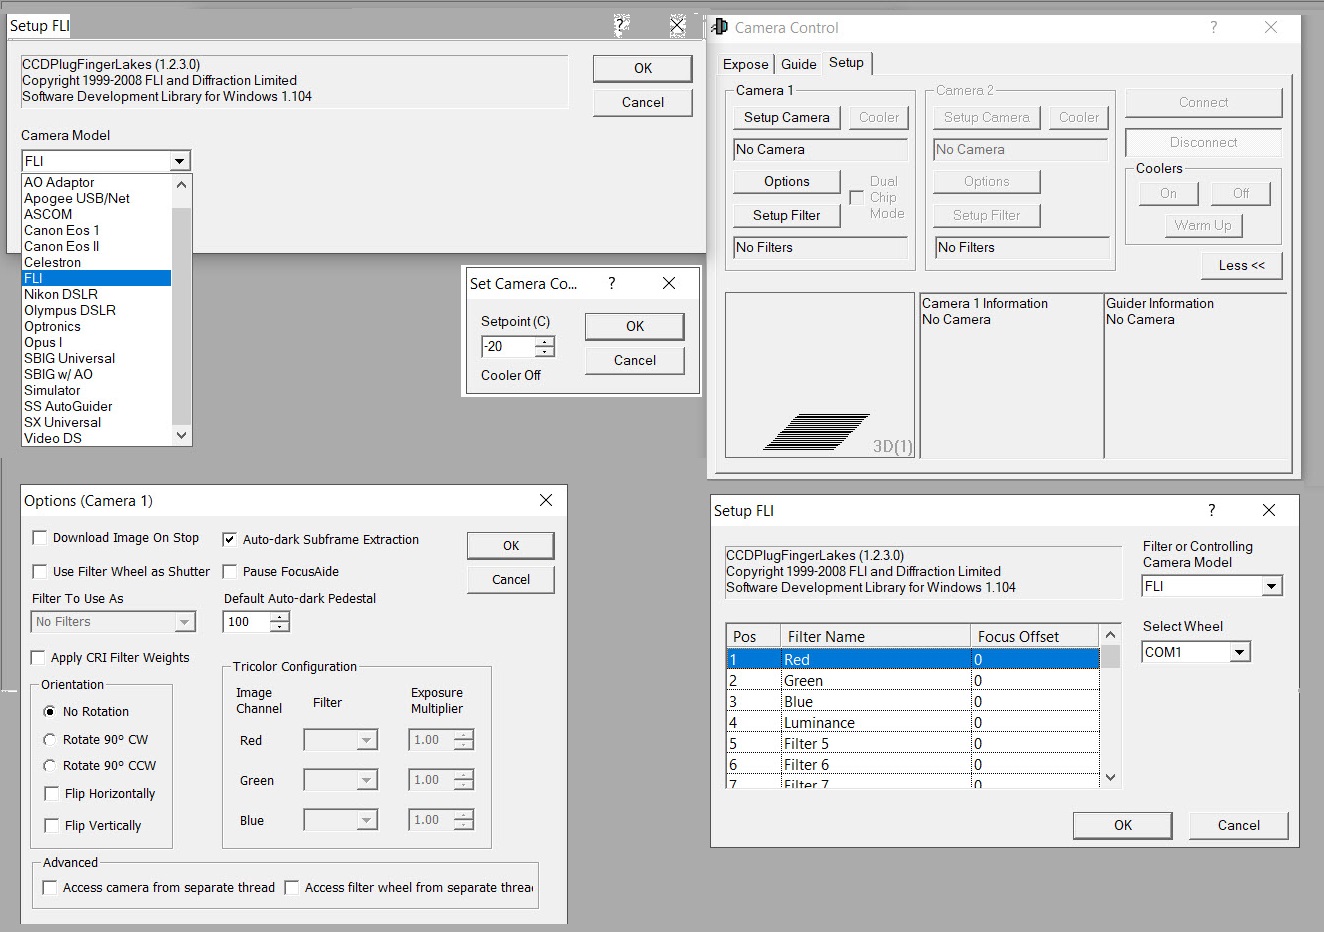
The first setup will be your camera. The camera 1 area should be your main imaging camera. Select your Ascom driver from the drop down menu. Depending on your camera manufacturer you may or may not have to select your specific model in the drop down menus. Once you select your camera you can then click options and toggle on/off the different options you want to use or turn off. If your camera has a cooler you can click cooler and set the cool point. You cant set this until you connect your camera. Once you have the cool point set you will have to click on the cooler on button. The last setup would be the filters if you have a mono camera. The default list is RGBL. Adjust the list to your Filter Wheel setup and you can add narrow band if you have them in as well. If your filters aren’t para-focal or if they are with a slight offset you can enter your filter offsets in the filter window as well. If you have a color camera select the readout mode to color instead of monochrome.
Camera setup 2 will be your guider camera and you will do the same setup as above but select your guide camera.
Now that we have the cameras set up we will move to the rest of our equipment. Click on the observatory button (Dome icon). The first tab is your catalog tab which we will come back to. Click on the telescope tab followed by the site and optics button. Here you will enter your telescope focal length, aperture, and for the obstruction of your scope if any. You will do the same for your guide scope and you will need to enter your site location. If you have a GPS or you use EQMOD you can click load from scope and it will auto fill. You can also set alarms, Add fits header data to be collected and adjust other settings in this window
The next few tabs we will skip until later and go straight to the setup tab. We will come back to the other tabs later however we need to connect our equipment first so click on the setup tab. In this tab you select the black arrows next to each piece of equipment and select the Ascom driver for the corresponding line. After you select the Ascom for everything you can click connect all or individually connect to the equipment you plan on using. The options tab allows you to eliminate the tabs you don’t use and de clutter the window for future use.

Now that we have all our equipment connected lets get started with preparing for integration. You will want to Polar Align your mount at this point and then proceed from there. If you don’t have a planetary program such as THESKYX then you can use the built in Catalog in the observatory Icon. We will first want to focus. To achieve the best focus you really don’t want to use a bright star such as Rigel. You are better off using a Mag 4-5 star. So pick a target (Not a globular cluster) and check the stars around it. To pick an object select the category you want in the scroll down menu. Once you do that you select the Object ID. If you select Deep space it will give you the options of the different object catalogs such as Messier and Barnard. Once you select the Object ID click Search. Below the search button you will get the search results. Select your object and click go to.

Now under normal circumstances you would see if your object is in the sky and if its not you will plate solve but we will save that for later since you don’t have to be on target to achieve focus. When you download your first image see if your close to focus. If you have donuts try to adjust in/out your focuser until you have as close to focus as you think you can get. Once you’ve done that you may wonder how can I tell what Magnitude a star is. Well you open the cross hair icon for the information window and drag the cursor over a star and see what the magnitude says, if its not a 4-5 mag keep checking. Once you find the star you want you can focus 2 ways. One would be manually and the other through a focus routine.

Manual focus:
TO manually focus you will open up the camera icon and go to the expose tab. Under expose change the exposure preset to focus. Make sure subframe and mouse is checked. Then you want to draw a box around your mag 4 star. Then select continuous on the right so your exposures are taken automatically. Lastly under the options arrow display large statistics. Once you have all that setup select a low exposure time somewhere between .5-1 sec and begin exposing. If you are using Narrowband filters your exposure times will need to be longer. Start adjusting your focus paying attention to your FWHM (Full width half max) number. You want to get this number down as much as possible. Keep an eye on your MAX: Number. This is essentially your well depth. If you max out at 65000 that means you need to stop exposing and reduce your exposure length again and restart. As your keep reaching MAX you are getting into better and better focus. Once you’ve reached critical focus you will see your FWHM start to go up instead of down. Back off on the focus and your done. You can do this adjustment throughout the night for a quick focus or if the focus routine isn’t working well.

AutoFocus:
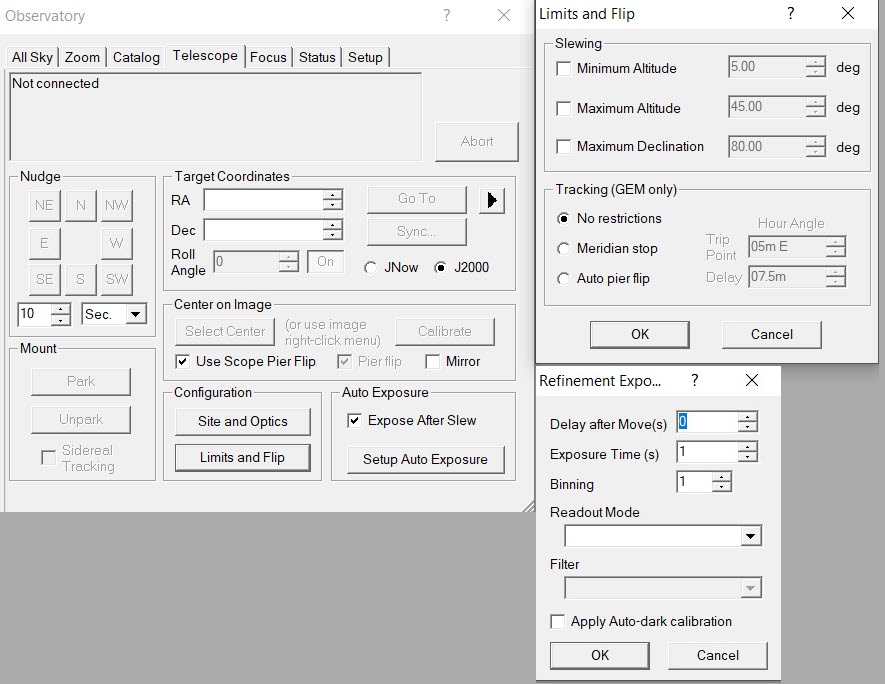
Click on the Autofocus options button. This is where you will enter some important information. Its critical you enter your telescope focal ratio and step size. If you dont know your step size you can click the auto button. After that click Exposure. Set Delay after Move to 0, Exposure Time to 1 second, Binning to 1, Subframe Width and Subframe Height to 100. If your camera has a shutter turn on Apply Auto-dark calibration. If your camera is very slow or is one-shot color, turn on Use Fast Download if available. Click OK. Point the telescope at a Mag 4-5 star and click Start. As the exposures are taken you will see point appear on the V curve. At the end of the routine you should have what looks like a V with your best focus at the bottom of the V. This will be your optimum focus and what it will be set to.
If you find the focus is just not good enough you can always go to the manual focus and fine tune. This can happen when the Seeing is not that great at night.

Now that we are in focus lets get to our object. Once again go to the catalog, Under the observatory icon, and pick your object and click goto. Then go to the camera icon and expose using the preset Find star and maybe increase your exposure time to 10 sec. If your object is dim you can increase the exposure of use the find DSO preset however we are working on plate solving so we need stars not necessarily the object itself. As discussed before you may not be on target. This is normal and if this is your first time astroimaging don’t worry. You want to click on the Analyze menu at the top of the screen and select Pinpoint Astronomy. The first thing you need to is set the plate solve directory. At the bottom left of the window you will see Catalog Setup. Use the GSC-1.1 (corrected) and Click the Path button and direct it to the C:\GSC11| folder or where ever you installed it. You can use and select other catalogs if you prefer. Some catalogs are better for longer focal lengths for faster solving. You can adjust how many stars to use to solve and magnitudes to use if you are having problems solving. You can manually set your pixel scale or Maxim will pull it from your fits header data. Once you have all that set click process. You will see a blue line run across the screen and in the window you will see it trying to match the image. Once its complete you will see where you actually are in the sky and what angle your camera is, which helps you rotate your camera to get the same angle as a previous image in case you do multiple night images.
After you plate solve its VERY IMPORTANT to sync before you do anything else. So click close on the pinpoint window and open the observatory icon and select the telescope tab. You should see your plate solved coordinated in the target coordinate area and click SYNC. Once you’ve done that Maxim knows where you are in the sky so you will now need to slew back to your target. So go back to the catalog and re-select your target and click goto. Expose another image and you should have your target in the FOV. If its not centers you can plate solve again and see what happens or you can plate solve the image and instead of syncing right click the image where you want it centered and select point telescope here. You can also right click your image and turn on the cross hairs if you want to manually adjust the image to center.

Now that we are on target and in focus we are almost ready to run a sequence. Last thing we need to do is to setup our guider. to Access the guider click on the camera icon and select the guide tab. I normally adjust the exposure time to approximate 3 seconds. This timing is what will be used during your guiding run. Next click on settings. This will give you options to adjust for calibration and guiding. For a good guiding I recommend changing the Cal. Time to 60 for X and Y axis. It takes awhile but the more calibration time the better your guiding will be. Calibration will generally take approx 5 min with 60 as your setting. Once your done with that click expose and it will bring up your guider image. Check the focus of your guider. You dont want donuts and its always better to have slightly bloated stars than pinpoint when guiding so dont kill your self on a sharp focus like you need for your main imaging camera. Once you have the image you want to select a star by clicking on it. You dont want one to bright or to dim. A Mag 3-4 star is perfect for guiding. When you click on the star you will see the guide star X,Y coordinates change. This is the star that will be used for calibration. Once you’ve clicked the star select the calibrate button and wait while it runs. You will see in the Camera 2 window the X and Y positions change as it adjust on that Axis. You will also see a red line form. The Line should be a rough 90 degree angle, if its not then your guiding may be off and possibly something is pulling on your image train. If the X,Y doesn’t move enough you can always increase your cal time or select a different star and try again. After your calibration is complete just click the Guide button and you will be guiding.
Once your guiding you can bring up your graph to see the corrections. I recommend selecting the Black arrow in the graph and changing the Plot to Lines and changing the vertical scale to Arc Seconds and .5. You generally want low corrections. If your Arc sec graph is set to high it will look like your guiding is flat lined but your images will look bad. With the reduction you will closely see the adjustments and you can use this to change the aggressiveness of the X,Y axis to try and reduce the corrections.

So now we should be in focus, on target and guiding. Its worth noting when calibrating your mount moves. Ideally the calibration should start and end on the same coordinates. Take a picture and make sure you are happy with the FOV and location of your object. If it has moved stop your guiding, recenter and restart your guiding. You DO NOT need to re-calibrate. Just select a new or the same star and click guide. Some people like to recalibrate after a meridian flip but you can decide depending on how your guiding is after the flip. For integration go back to your camera control icon and change the PRESET TO LRGB. This will change your exposure type to Autosave on the right side of the window. Click on Autosave and it will open your sequence setup.
Autosave Filename is what you want to name the image set. Estimated duration you don’t touch as that will adjust based on your number of subs. The delay first and between is the time you want to delay before the camera starts to expose and the delay between is the delay you want between exposures. Delay before if good if you are running darks at home or if you need time to do something else prior to your run. Delay between , when used, gives your guider more time to settle back down. Dither applies to your guiding. If you have artifacts in your images its because you aren’t dithering. Camera chips get dead pixels, bad columns, etc. Dithering will move your image slightly every exposure placing those artifacts in different places. When you go to stack these artifacts will stack out unlike if they are all in the same place. Medium to high dither is a good option. Per Diffraction Limited: Astrometric Resync When taking long sequences of unguided images, the telescope will usually slowly drift off target. To prevent this, turn on Astrometric Resynchronization. This uses PinPoint Astrometry to measure the exact position of the most recently captured image. This information is then used to recenter the telescope. Even with guiding I still use the Sync Telescope option. Lastly you need to set your directory. Click on the options arrow and select Set Image Save Path. Then select the folder you want the data saved in.
Now that we have those set lets set our run. If you have a color camera you just need to select one slot and select light as your type. If you have a OSC and want to run darks and biases then you will turn on 2 slots and change the type to the type of image you want to capture. For mono cameras you will need to have 3-4 slots selected depending if you are doing LRGB, RGB, Mono HA, Sii, Oiii. You will then select the filter for each slot. Note you will also have the type selected as light. Then create the suffix for the image, i.e. filter color R, G, B etc and for OSC you can place whatever you want in there. Exposure will be the length of the exposure you want. Binned will be the binning. OSC should choose under most circumstances. Speed is only adjustable based on your model camera and readout mode will be adjusted to mono or color depending on your camera. Repeat is for how many subs you want of each filter. Once you have all that setup click apply and OK. The window will close and you will be at the main Camera control window and just click start.

You are now on your way to acquiring all the data for your nights run. You may want to check your FWHM during the night as temperatures change and refocus. You may also choose to Meridian flip manually or select the auto pier flip. The auto pier flip can be found in the observatory icon under the telescope tab and under the button Limits and flips. Select the Auto pier Flip and select how far past the meridian you want it to slip. Once the mount reaches that point and after an exposure Maxim will stop all your runs, Flip and should reacquire your guiding.
You can also setup the Auto exposure in the telescope tab. This will take images automatically after a slew. This way you don’t have to go to expose every time.
Lastly when your images start to download they may look dark or to bright. Here you can open the stretch icon and adjust the stretch of your images to see how they look and more importantly it will help define your stars so you can zoom in and see if there is any drift in your guiding and make adjustments before you lose to many subs.
That sums it up for the integration process and sequence of Maxim DL. Keep an eye out for our part 2 tutorial which will be on using Maxim DL to Calibrate, Stack and process your acquired images.
Maxim DL Level Options: